In this tutorial, ane will provide a way to install a freebsd operating system in virtualbox, with this application we as users are very easy to learn about how to install any operating system, want it to test before installing permanently and see what features are offered.
With the virtualbox application, users can install the installation of the operating system without having to be permanently stored on the kmoputer / laptop hard drive, as if we have more than one operating system, before doing the installation that must be prepared, namely:
- Virtualbox application that is already installed on a computer / laptop
- Freebsd operating system files are extensible *.iso
- Internet connection for app updates from freebsd
How to get virtualbox and iso freebsd files ? , you can visit the official website of virtualbox and freebsd.
FreeBSD
In this article how to install freebsd in virtualbox using computer resources with 1GB ram, 25 GB hard drive, using 2 network adapters "NAT" and "Host-Only Adapter" on the network settings in the virtual machine, with iso freebsd bearsitektur x64 file.
Install FreeBSD Steps
Boot view when going to perform the freebsd installation, press enter on the keyboard to continue the next freebsd installation.
Select Install, press enter
Select the type of keyboard used, just select the default and then press enter
Input hostname for freebsd operating system
Selection of components to be inputted and run in freebsd, leave the default only, press enter
For FreeBSD supports the first 2 types of application source code files where we have to compile first in order to be used, Both binary with this do not need tocompile manually.
Select the partition creation method on the hard drive you want to use, just select "Auto (UFS)", and then press enter.
Whether the hard disk partition we want to use for all freebsd systems if yes select "Entire Disk", if you want to divide again for others select "Partition".
Here all hard drive sizes are used for freebsd, select the entire disk press enter.
Partition the schema you want to use, because using freebsd select "BSD BSD Labels", press enter.
Partitions are set there are 2 partitions, the total total of the partition is 25 GB divided into 2 partitions, 24 GB for freebsd or commonly referred to as "root" (ada0a).
(ada0b) with a size of 1 GB is used for swaps used for virtual ram using a hard drive, select finish for the freebsd installation process.
Confirm the partition that has been created, just select commit to approve it.
The process of extracting and installing the freebsd operating system, wait until the process is complete.
Enter a password for the root user or commonly called user Administrator.
Configuration of the interface to be used to connect to the internet, here freebsd using the first 2 interfaces with type "NAT", and second "Host-Only Adapter" configuration ip address manual, press enter.
Select yes to use IPv4 for its IP address on freebsd.
Select DHCP so that freebsd is automatically assigned an IP address from nat virtualbox, yes.
IPv6 is not used just select "no"
For DNS just clear it because it uses the Dhcp IP of nat VirtualBox which is automatically assigned, ok
time zone configuration, select asia and then, ok
choose indonesia adjust to us being, then ok
Choose the time according to us because ane is in Java, choose "java & sumatra", ok
Confirm for settings from time zone
Time setting on freebsd skip it, configuration directly in freebsd seniorly, Select Skip.
Select Skip Only
just continue no one in the fox, just let it default.
Disable the "disable sendmail service" feature because it is not used by giving an asterisk by pressing the space on the keyboard, Select Ok
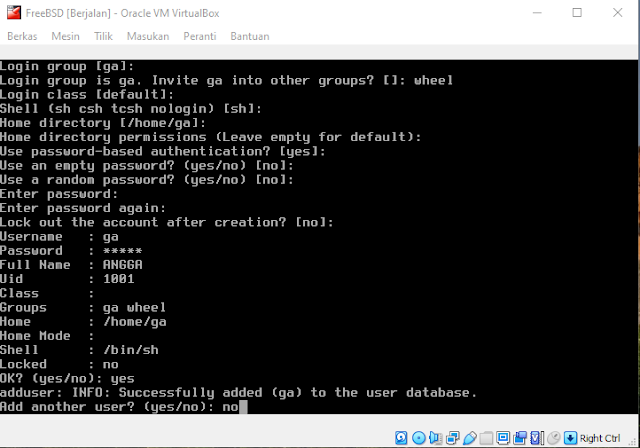
Select yes to add new users to freebsd.
Creating new users on freebsd
Here ane create a username ga, with a secret password and enter the username ga into the wheel group so that it can access full (administrator) freebsd.
End of freebsd configuration, select exit and then ok
Configuration Manual, select no press enter
Done, select reboot to restart the freebsd system, removing the linked iso file in the virtual machine settings so as not to boot again.
Login with the username previously created for example here with username ga, secret password
Note:
su - , to enter the root user and enter the root password that was previously created.
reboot , reboot command to restart freebsd
poweroff, for shutdown freebsd
Well that's how to install freebsd in virtualbox, this uses the latest freebsd version 13.0 in 2022.
Install VIM Text Editor in Freebsd
By default the text editor on freebsd uses vi, the average user when configuring the server uses the vim text editor, but depends on it itself. wellh here will exemplify install text editor in freebsd based on text / terminal.
Make sure the computer / laptop is connected to the internet running a virtualbox application that runs a freebsd operating system virtual machine.
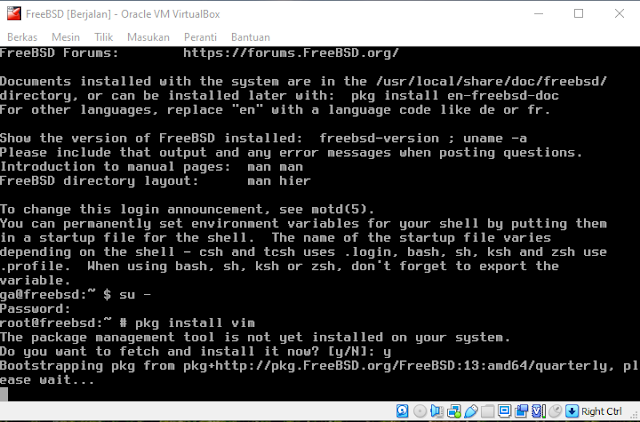
Login to freebsd that uses the user created during the installation process, for example here enter with a user ga with a secret password.
Enable the root user/administrator to gain full access to the freebsd system by entering the su - command and entering the password from the root.
To see whether or not to enter the root user the $ sign turns into the # symbol that it signifies that it has entered the root user
Enter the pkg install vim command on the freebsd terminal and then press enter, wait until the repository database update process is complete
After completing the database repository update process, enter y to continue the download process and install the vim application wait until the process is complete.
To run the vim text editor input vim on the freebsd terminal and then enter.
That's the steps install text editor vim in freebsd, good luck.


